
Views: 0 Author: Site Editor Publish Time: 2026-02-14 Origin: Site


You need advanced skills to achieve excellence in power amplifiers design. Selecting the right amplifier class and mastering performance metrics can shape your project’s success. Design subtleties often separate good results from great ones. For deeper understanding, you should explore authoritative resources like Cordell and Self. Advanced knowledge helps you create designs that deliver clear sound and reliable operation.
Understand different amplifier classes. Each class, like A, B, AB, and D, has unique features affecting sound quality and efficiency.
Match the amplifier class to your application. Choose Class A for high-end audio, Class D for portable devices, and Class AB for a balance of quality and efficiency.
Focus on performance metrics. Key metrics include Total Harmonic Distortion (THD), efficiency, and signal-to-noise ratio (SNR) for optimal sound quality.
Manage quiescent current carefully. Proper settings prevent distortion and ensure reliable operation in your amplifier design.
Use simulation tools like SPICE. Simulating your designs helps identify issues early and optimize performance before building prototypes.
Pay attention to PCB layout. A well-designed layout minimizes noise and crosstalk, enhancing overall sound quality.
Implement effective EMI mitigation strategies. Use shielded cables and proper grounding techniques to reduce unwanted noise in your audio system.
Engage in continuous learning. Join online communities and read authoritative books to stay updated on amplifier design innovations and best practices.

You will find several amplifier classes used in audio systems. Each class has unique features that affect sound quality, efficiency, and application. The most common types include class a amplifier, class b amplifier, class a/b amplifier, class d amplifier, class G, class DG, class H, and class E. You should understand how each class operates to make the best design choices.
Class | Conduction Characteristics | Efficiency | Typical Applications |
|---|---|---|---|
A | Conducts through full cycle | 15-35% | High sound quality |
B | One device conducts at a time | >75% | Limited use due to distortion |
AB | Conducts 181-200 degrees | Up to 70% | Combines A and B benefits |
G | Voltage rail switching | N/A | High power amplifiers |
H | Modulated voltage rail | N/A | High power amplifiers |
D | PWM modulation | 90% or higher | Efficient audio amplification |
DG | Multilevel output stage | Higher than D | Efficient audio amplification |
E | Tuned switching, high frequency | Up to 80% | RF and high-frequency audio |
You can see that each amplifier class offers different conduction and efficiency characteristics. For example, class a amplifier provides the highest sound quality but lower efficiency. Class b amplifier improves efficiency but introduces crossover distortion. Class a/b amplifier balances both, making it popular in many audio designs.
You should know how each amplifier class works to meet your design specifications. Class a amplifier conducts for the entire input cycle, which gives you excellent linearity and low distortion. However, it wastes a lot of power as heat. Class b amplifier uses two devices, each conducting for half the cycle. This design increases efficiency but can cause distortion at the crossover point. Class a/b amplifier combines both approaches, reducing distortion and improving efficiency.
Class d amplifier uses pulse-width modulation to switch devices on and off rapidly. This design achieves very high efficiency and is ideal for portable or battery-powered systems. Class G and class H amplifiers use multiple or modulated voltage rails to improve efficiency in high-power designs. Class DG adds a multilevel output stage for even better efficiency.
Class E stands out for high-frequency applications. You will see this class in RF transmitters and some specialized audio systems. Its tuned switching design allows for efficient operation at frequencies where other amplifier classes struggle.
Tip: For a deeper understanding of these amplifier classes, you should read "Audio Power Amplifier Design Handbook" by Douglas Self and "Designing Audio Power Amplifiers" by Bob Cordell.
You must match the amplifier class to your application for the best results. Class a amplifier suits high-end audio where sound quality matters most. Class b amplifier is rare in modern audio because of distortion. Class a/b amplifier works well in home and professional systems, balancing quality and efficiency.
Class d amplifier fits portable speakers and devices that need long battery life. You will find class G, DG, and H in high-power systems like concert amplifiers. Class E is essential for high-frequency or RF audio work.
The output filter in class d amplifier reconstructs the original audio signal.
It also reduces the switching carrier frequency.
Careful design ensures the filter does not affect the audio band.
You should always consider the design requirements and application needs when choosing among amplifier classes. This approach helps you achieve the best performance and reliability in your audio projects.
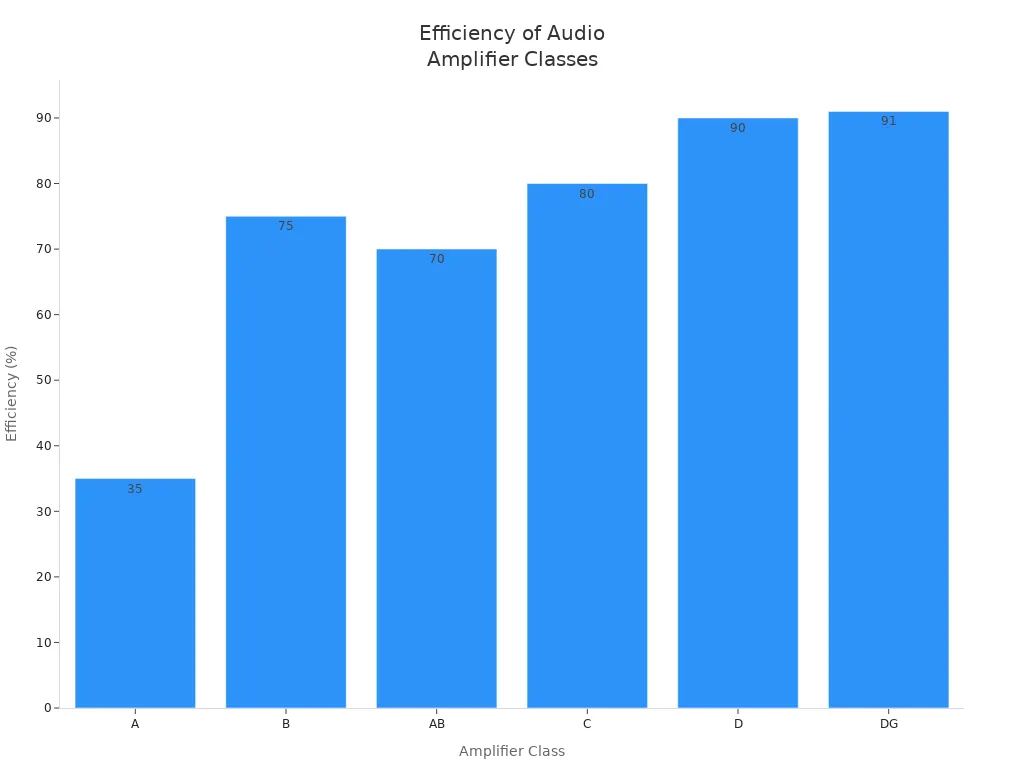
You need to understand how each amplifier class affects performance and efficiency. Efficiency tells you how much power the amplifier converts into useful audio output. Low efficiency means more heat and wasted energy. High efficiency means less heat and longer device life. You can see the typical efficiency ranges for each class in the table below:
Amplifier Class | Efficiency Range |
|---|---|
Class A | 20-30% |
Class B | 30-40% |
Class AB | 1-10% |
Class C | 70-80% |
Class D | 90% or higher |
Class G/H | 60-80% |
Class A amplifiers give you excellent sound quality but waste a lot of energy as heat. Class B amplifiers improve efficiency but sacrifice sound quality. Class AB amplifiers balance both, offering better efficiency than Class A and less distortion than Class B. Class D amplifiers use switching technology to reach very high efficiency, making them ideal for portable and battery-powered systems. Class G and Class H amplifiers use advanced rail switching to boost efficiency in high-power designs.
Tip: You should always consider the cooling needs and power supply when you choose an amplifier class for your design.
Distortion changes the original audio signal and affects sound quality. Each amplifier class has unique distortion traits. Class A amplifiers produce very low distortion and deliver high sound quality. Class B amplifiers suffer from crossover distortion, which makes them less suitable for audio applications. Class AB amplifiers reduce this distortion by blending the operation of Class A and Class B. Class D amplifiers can offer good sound quality, but their distortion depends on the quality of the design and filtering.
You should know that Class A gives you the best sound quality. Class B is not favored because of its distortion. Class AB improves sound quality by minimizing distortion during the transition between transistors. Class D can vary, so you must pay attention to the design and filtering to achieve good results.
You need to select the right audio power amplifier class for your application. You should follow these steps:
Power Requirements: Choose an amplifier that can deliver about twice the power your loudspeakers need for regular use. This gives you headroom for brief peaks.
Impedance Matching: Check the impedance of your loudspeakers and how you wire them. Make sure the amplifier matches the impedance for safe and efficient operation.
Sensitivity: Look at the sensitivity of your loudspeakers. Higher sensitivity means you need less amplifier power.
Amplifier Type: Decide if you need a mono, stereo, or multichannel amplifier based on your design.
You should also calculate the target sound pressure level (SPL) at the listener’s position. Find the required SPL at one meter from the loudspeaker based on its sensitivity. Select an amplifier that supports the peak power needed for your loudspeaker.
Note: You must understand power, voltage, and impedance. These factors help you match the amplifier to your loudspeakers and ensure your design works efficiently.
You can improve your design by comparing the practical differences and trade-offs between amplifier classes. You should focus on efficiency, distortion, and application needs. This approach helps you choose the best audio power amplifier for your project.
You need to evaluate efficiency and power handling when you design power amplifiers. Efficiency measures how much electrical energy the amplifier converts into useful audio output. High efficiency reduces heat and improves reliability. Low efficiency wastes energy and can cause overheating.
Power handling describes how much power the amplifier can deliver to the loudspeaker. You must match the amplifier’s power handling to the speaker’s capability. If you exceed the speaker’s limits, you risk damaging the speaker and reducing audio quality. Over-driving a speaker causes compression, which lowers sensitivity and increases distortion. This can lead to permanent damage.
Power handling depends on the duration and frequency of the signal.
Excessive power over time can harm loudspeakers.
Matching amplifier power to speaker capability improves reliability.
You should always consider both efficiency and power handling in your design. This helps you create power amplifiers that deliver strong performance and last longer.
Linearity shows how accurately the amplifier reproduces the input signal. You want the output signal to match the input signal as closely as possible. Real-world systems always show some distortion, which means the output signal deviates from a perfect sine wave.
Total Harmonic Distortion (THD) measures how much unwanted signal the amplifier adds. Keeping THD low is important for clear sound and efficient operation. Industry standards suggest THD+N should stay below 0.1% across the audio band. This level ensures the amplifier delivers high-quality sound.
For meaningful THD+N measurements, you must specify stimulus level, frequency range, measurement bandwidth, and gain. For example, THD+N less than 0.01%, 1 Vrms, 20 Hz - 20 kHz, unity gain, 20 kHz bandwidth. You should always check these details when you compare power amplifiers.
THD has been a key specification since 1935.
Low THD+N improves system efficiency and extends equipment lifespan.
Linearity and THD are critical for audio quality.
You need to focus on linearity and THD in your design. This helps you build power amplifiers that produce accurate and clean audio signals.
Frequency response tells you how well the amplifier reproduces signals across the audible range. You want the amplifier to handle frequencies from 20 Hz to 20 kHz. This range covers the entire spectrum of human hearing.
A consistent frequency response ensures the amplifier maintains tonal balance and clarity. Variations can affect sound quality. Many power amplifiers can handle frequencies up to 100 kHz at low power. However, performance at 20 kHz depends on the type of output transistors used in the design.
Research shows that amplifiers designed to limit frequencies above 20 kHz do not sound different from those that can amplify higher frequencies. Excessive high-frequency capability does not improve audio fidelity. You should focus on the 20 Hz to 20 kHz range for the best results.
Tip: Always check the frequency response specification when you select power amplifiers for your design. Look for a ±3 dB range across 20 Hz to 20 kHz.
Metric | Description |
|---|---|
Frequency Response | Measures the amplifier’s ability to maintain consistent output across frequencies, typically within a ±3 dB range. |
Noise Measurements | Includes Signal-to-Noise Ratio (SNR) to assess the amplifier’s baseline noise. |
Distortion Tests | THD+N sweeps reveal distortion behavior over varying levels and frequencies. |
Intermodulation Distortion | Identifies additional distortion not visible with single-tone tests. |
Gain | Indicates the amplifier's ability to increase signal strength. |
Phase | Assesses the timing relationship between input and output signals. |
Damping Factor | Reflects the amplifier's control over the connected speaker. |
Crosstalk | Measures the degree of interference between channels. |
Common Mode Rejection Ratio | Evaluates the amplifier's resistance to noise or interference, especially with balanced inputs. |
You need to pay attention to frequency response when you design power amplifiers. This ensures your amplifier delivers clear and balanced audio signals.
You need to understand signal-to-noise ratio (SNR) and dynamic range when you design or select power amplifiers. SNR measures how much louder the audio signal is compared to the background noise. Higher SNR means cleaner sound and less unwanted noise. Dynamic range shows the difference between the quietest and loudest sounds the amplifier can handle without distortion.
You can use SNR and dynamic range to judge the quality of a power amplifier. If you want professional results, you should look for high SNR values. Entry-level equipment usually offers SNR between 80dB and 90dB. Intermediate and advanced models reach 90dB to 100dB. Professional amplifiers deliver 100dB to 120dB. High-end professional gear can exceed 129dB.
Equipment Level | Signal-to-Noise Ratio (SNR) |
|---|---|
Entry level | 80dB to 90dB |
Intermediate and advanced | 90dB to 100dB |
Professional | 100dB to 120dB |
High-end professional | More than 129dB |
You should aim for a power amplifier with SNR above 100dB if you want studio-quality audio. This level ensures the amplifier produces clear sound with minimal background noise. Dynamic range matters for music with wide variations in volume. A wide dynamic range lets you hear both soft and loud passages without distortion or loss of detail.
Tip: Always check the SNR and dynamic range specifications when you compare power amplifiers. These metrics help you find equipment that delivers clean and accurate sound.
You can improve your audio system by choosing amplifiers with high SNR and wide dynamic range. This approach gives you better clarity, more detail, and a more enjoyable listening experience.
You need to manage quiescent current carefully in any audio amplifier design. Quiescent current is the small amount of current that flows through the amplifier when no audio signal is present. If you set this current too high, the amplifier wastes energy and generates excess heat. If you set it too low, you risk increased distortion, especially in class AB designs. Class AB amplifiers are popular in high-fidelity audio amplifier systems because they maintain a small quiescent current. This approach helps you minimize distortion while balancing performance and efficiency. You should always check the quiescent current during the design process. Adjusting it properly ensures your audio amplifier delivers clean sound and reliable operation.
Tip: Use precision resistors and thermal tracking devices to stabilize quiescent current in your audio amplifier. This practice prevents drift and keeps distortion low.
You must reduce distortion to achieve high-quality sound in your audio amplifier. Distortion changes the original audio signal and can make music sound harsh or unclear. In modern audio amplifier circuits, low distortion is especially important in the 2KHz to 5KHz range. One effective technique is negative feedback. You apply negative feedback by feeding a portion of the output signal back to the input. This method helps you minimize distortion products and keeps them at acceptable levels. Managing high-frequency signals is also crucial. Proper routing techniques prevent signal degradation and reduce distortion. You should pay attention to compensation and error correction methods during the design phase. These advanced techniques help you achieve the best possible performance from your audio amplifier.
Note: Always test your audio amplifier for distortion across the full frequency range. Use THD measurements to verify your design meets industry standards.
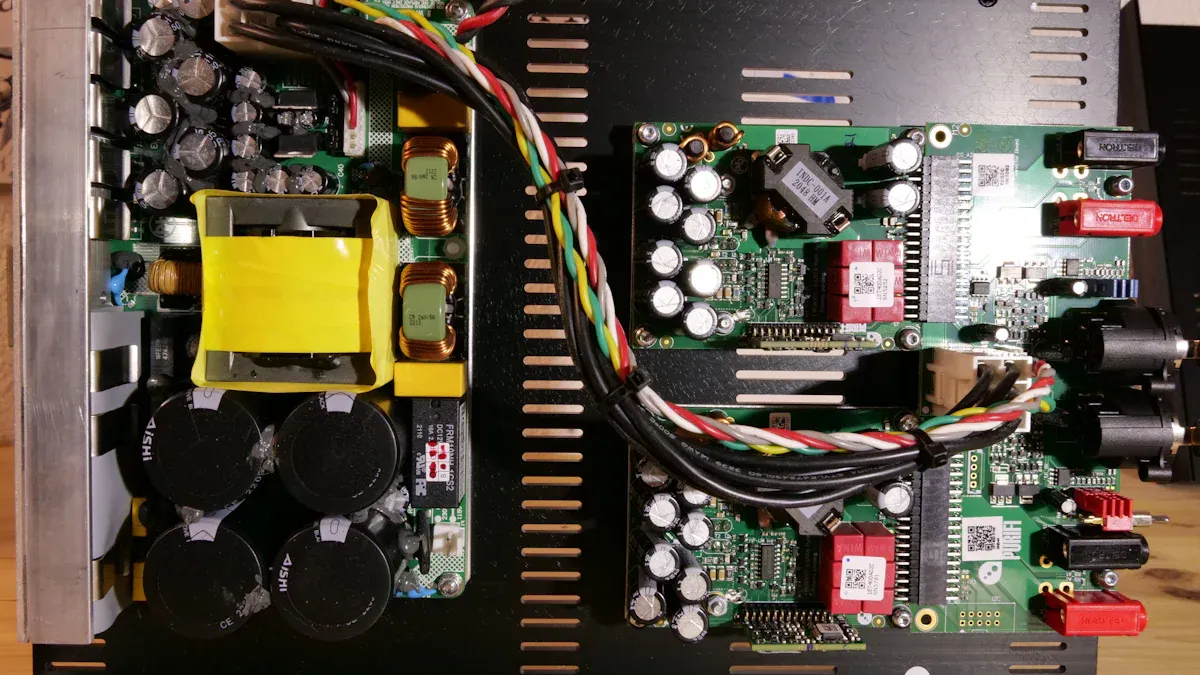
You need to design the printed circuit board (PCB) layout carefully for any audio amplifier. The layout influences noise, crosstalk, and overall sound quality. Follow these best practices:
Star grounding eliminates multiple ground paths and reduces ground loops. This ensures return currents do not interfere with sensitive audio signals.
Place sensitive components away from high-current or high-noise areas. This minimizes interference and keeps your audio amplifier quiet.
Group analog components together and separate them from digital components. This prevents crosstalk and improves performance.
Route audio signal traces away from power supply lines and high-current paths. This reduces noise pickup and keeps the signal clean.
Maintain at least 0.2 inches (5 mm) of separation between traces of different channels. This minimizes crosstalk and preserves channel integrity.
You should select high-quality components for your audio amplifier design. Choose low-noise resistors, capacitors with stable values, and reliable connectors. These choices help you build an audio amplifier that delivers clear sound and lasts longer.
Callout: Careful PCB layout and component selection are essential for achieving professional results in your audio amplifier design.
You must design the power supply and grounding system carefully for any audio amplifier. The power supply provides energy to all amplifier stages. If you choose the wrong supply, you risk noise, hum, or even damage. You should select a supply with enough voltage and current for your amplifier’s needs. Linear power supplies offer clean power but weigh more. Switching supplies save space and weight but can introduce high-frequency noise.
You need to use proper filtering to remove unwanted ripple and spikes. Large capacitors smooth out voltage changes. You can add smaller bypass capacitors near each amplifier stage. This practice helps you keep the audio signal clean. You should place the power supply away from sensitive audio circuits. This reduces electromagnetic interference (EMI).
Grounding plays a key role in audio amplifier design. You must create a single ground reference for all parts of the circuit. Star grounding works best. In this method, you connect all ground points to a central location. This prevents ground loops and reduces hum. You should avoid connecting grounds in a loop or daisy chain. Loops pick up interference and cause noise.
Tip: Always use thick wires for ground connections. Thin wires increase resistance and allow noise to enter the audio signal.
You can use a table to compare grounding methods:
Grounding Method | Noise Risk | Complexity | Best Use Case |
|---|---|---|---|
Star Ground | Low | Moderate | High-fidelity systems |
Bus Ground | Medium | Simple | Small amplifiers |
Chassis Ground | High | Simple | Non-critical systems |
You should test the power supply under real load conditions. Measure voltage and current while the amplifier plays music. If you see voltage drops or hear hum, you need to improve the supply or grounding.
Advanced compensation and error correction techniques help you stabilize the power supply. You can use voltage regulators to keep output steady. Some designs use feedback circuits to correct errors in real time. These methods protect the audio amplifier from sudden changes or faults.
You must protect the amplifier from surges and shorts. Fuses and thermal sensors detect problems and shut down the system. You should place these devices near the power supply input. This practice keeps your audio amplifier safe and reliable.
Callout: Careful power supply and grounding design prevents noise, protects your equipment, and ensures clear sound. You should always review these systems before finalizing your audio amplifier design.
You need to simulate and model your audio amplifier designs before building them. Simulation helps you predict performance, spot errors, and optimize circuits. Modeling gives you a clear view of how your amplifier will behave in real-world conditions.
SPICE (Simulation Program with Integrated Circuit Emphasis) is a powerful tool for audio power amplifier design. You can use SPICE to test your circuit without building it. SPICE lets you analyze different aspects of your amplifier, such as frequency response, noise, and distortion.
Here is a table showing common SPICE analysis types and their uses:
Analysis Type | Description |
|---|---|
AC analysis | Analyzes linear small-signal frequency response of the circuit. |
DC analysis | Calculates the nonlinear quiescent point of the circuit. |
DC transfer curve analysis | Evaluates a series of nonlinear operating points by sweeping an input voltage or current. |
Noise analysis | Assesses uncorrelated noise currents at a chosen output point using an adjoint matrix technique. |
Transfer function analysis | Computes small-signal input/output gain and impedance. |
Transient analysis | Provides time-domain solutions for nonlinear differential algebraic equations. |
You can run AC analysis to check how your amplifier handles different frequencies. DC analysis helps you set the right quiescent current. Noise analysis shows you where unwanted signals may appear. Transient analysis lets you see how your amplifier reacts to sudden changes.
Tip: Use SPICE to compare different circuit designs. This practice helps you find the best solution before building a prototype.
You must understand nonlinear behavior in audio power amplifiers. Real circuits do not always respond in a straight line. Nonlinear modeling helps you predict distortion and other unwanted effects.
You can use nonlinear models to simulate how your amplifier handles large signals. These models show you where distortion may occur. You can adjust your design to reduce these effects. Memoryless PA linearizers optimize reduction of integrated intermodulation distortion (IMD) power. This method gives you a clear figure-of-merit for amplifier linearizability.
Note: Nonlinear modeling helps you improve sound quality by identifying and correcting distortion early in the design process.
After simulation, you need to build and test a prototype. Measurement techniques help you evaluate your audio power amplifier accurately. You can use dynamic two-tone distortion response to check linearization. This metric is easy to assess with simulation or measurement data.
Here is a table of measurement techniques:
Measurement Technique | Description |
|---|---|
Dynamic Two-Tone Distortion Response | A mathematically founded metric for evaluating PA linearization, easily assessed through simulations or measurement data. |
Memoryless PA Linearizer | Optimizes reduction of integrated intermodulation distortion (IMD) power, providing a rigorous figure-of-merit for PA linearizability. |
You should invest in high-quality measurement equipment. The Audio Precision SYS2722 offers advanced capabilities for amplifier testing. The APx585 HDMI Analyzer lets you test multiple channels at once. These tools help you get reliable results and improve your design.
High-quality measurement equipment ensures accurate evaluation.
Consistent testing across channels improves reliability.
Investing in measurement tools shows your commitment to quality.
Callout: Simulation and modeling save time and resources. You can spot problems early and build better audio power amplifiers.
You may face oscillation and stability problems when you design or test an amplifier. Oscillation can cause unwanted noise, distortion, or even damage to your equipment. You need to know the most common causes so you can prevent these issues:
Parasitic oscillations often come from high-frequency resonant circuits created by input or output components.
Power supply oscillations may happen if the regulator becomes unstable or if the load current is too high.
Feedback issues, such as positive feedback from microphones to loudspeakers, can also trigger oscillation.
To solve these problems, you should keep signal paths short and use proper decoupling capacitors. You can add snubber networks to dampen high-frequency resonances. Always check your feedback loop for stability. If you see signs of oscillation, such as strange noises or heat, you should review your layout and grounding. Many engineers use products from brands like Auway, which offer stable designs and built-in protection against oscillation.
Tip: Use an oscilloscope to check for high-frequency oscillations during testing. This tool helps you spot problems early.
Matching the load and impedance is critical for any amplifier. If you ignore this, you may notice distortion or poor sound quality. Here are some common effects of mismatched loads:
Distortion and weak audio can result from improper load and impedance matching.
An amplifier designed for an 8-ohm load may not work well with a 4-ohm speaker. This mismatch can cause audio problems.
A 4-ohm speaker draws more current, which can overwork the amplifier and lead to clipping. Clipping distorts the sound and may damage the speaker.
High impedance can lower volume and dynamic range, making the audio sound flat.
Proper impedance matching ensures you get maximum power transfer and better sound.
You should always check the speaker’s impedance before connecting it to your amplifier. If you use multiple speakers, make sure the total load matches the amplifier’s rating. Many modern amplifiers include protection circuits that shut down the output if they detect a dangerous mismatch. Auway amplifiers often feature these safety systems, which help you avoid costly mistakes.
Electromagnetic interference (EMI) can ruin the performance of your amplifier. You may hear buzzing, humming, or other unwanted noises. To reduce EMI, you should follow these best practices:
Use shielded cables for all input and output connections.
Keep power supply lines away from sensitive audio paths.
Add L-C filters, especially in Class-D amplifier designs, to block high-frequency noise.
Place the power supply and transformer far from the amplifier’s input stage.
Use proper grounding techniques to prevent ground loops.
Many books on amplifier design include chapters on EMI mitigation. They discuss real-life examples and show how to solve common problems. You can also look for amplifiers with built-in EMI filters. Auway products often include these features, making them a good choice for demanding environments.
Note: Always test your amplifier in its final location. Nearby devices or cables can introduce new sources of EMI.
By understanding these challenges and using proven solutions, you can build reliable and high-quality amplifier systems.
You can learn a lot from real-world examples. These case studies show how engineers solved common power amplifier challenges. You will see practical troubleshooting steps and how Auway products helped improve reliability and sound quality.
An engineer noticed strange noises and overheating in a concert amplifier. The amplifier showed signs of high-frequency oscillation. The engineer checked the feedback loop and found long signal paths. He shortened the paths and added decoupling capacitors. He also installed a snubber network to dampen resonances. After these changes, the amplifier worked smoothly. The engineer chose an Auway amplifier for its built-in protection against oscillation. This decision reduced downtime and improved performance.
Tip: Always use an oscilloscope to check for oscillation during testing. Quick detection prevents equipment damage.
A studio technician connected a 4-ohm speaker to an amplifier rated for 8-ohm loads. The sound became weak and distorted. The technician measured the current and saw the amplifier was overworked. He replaced the speaker with one that matched the amplifier’s rating. He also used an Auway amplifier with automatic load detection. This feature shut down the output when it sensed a mismatch. The studio achieved clear sound and protected its equipment.
Problem | Solution | Result |
|---|---|---|
Impedance mismatch | Matched speaker and amplifier | Clear sound, no damage |
Overworked amp | Automatic load detection (Auway) | Reliable operation |
A home theater installer heard buzzing in the speakers. He traced the problem to electromagnetic interference from nearby devices. He used shielded cables and moved the power supply away from the input stage. He added L-C filters to block high-frequency noise. He also selected an Auway amplifier with built-in EMI filters. The buzzing stopped, and the system delivered clean audio.
Note: Test your amplifier in its final location. Nearby electronics can introduce new EMI sources.
A school auditorium faced frequent amplifier failures. The maintenance team wanted a solution that would prevent damage from surges and shorts. They installed Auway amplifiers with thermal sensors and fuses. These devices detected problems and shut down the system before damage occurred. The auditorium enjoyed reliable sound for every event.
Thermal sensors and fuses protect amplifiers from surges.
Automatic shutdown prevents costly repairs.
You can solve many amplifier challenges by following these examples. Choose products with built-in protection and test your system carefully. Auway amplifiers offer practical solutions for real-world problems. You will achieve reliable performance and clear sound in any environment.
You can advance your skills in amplifier design by joining specialized training programs. Biamp offers a comprehensive training program that connects AV professionals through role-based education. You gain practical knowledge and network with experts. Pro Sound Training’s Course 100 teaches audio principles and troubleshooting techniques. You learn best practices for amplifier setup and maintenance. The Sample Education Plan prepares you for live sound engineering. It covers sound reinforcement and psychoacoustics, which are essential for understanding how amplifiers interact with real environments.
Ongoing learning drives innovation in amplifier design. You discover new user-centric features and customization options that help you meet unique listening needs.
You should read authoritative books to deepen your understanding of amplifier technology. "Designing Audio Power Amplifiers" by Bob Cordell explains advanced circuit techniques and performance optimization. "Audio Power Amplifier Design Handbook" by Douglas Self covers distortion reduction and practical design subtleties. These books help you master the theory and practice of amplifier engineering.
You can rely on Auway for high-quality amplifier products and solutions. Auway’s website (https://www.cn-auway.com/) provides detailed information and technical support. If you want to explore advanced multi-zone solutions, visit Auway’s 8-zone amplifier page. Auway products feature robust protection systems and innovative designs, making them a trusted choice for demanding applications.
You stay ahead by engaging with industry standards and learning from trusted brands and experts.
You can join active online communities to share knowledge and solve amplifier design challenges. These forums offer technical discussions, product reviews, and troubleshooting advice. You connect with thousands of engineers and enthusiasts who help you improve your skills.
Community Name | Threads | Messages | Members |
|---|---|---|---|
Audio Science Review (ASR) Forum | 58,448 | 2,443,761 | 69,449 |
DIY Audio Forum | 2,100 | 56,900 | N/A |
Audio Power Product Reviews and Discussion | 5,500 | 316,100 | N/A |

You benefit from ongoing learning in these communities. You discover innovations in materials science, such as gallium nitride and silicon carbide, which improve amplifier performance and efficiency. You learn about new circuit architectures that reduce power losses and boost efficiency by up to 20%. Advanced digital signal processing techniques allow you to adjust amplifier settings dynamically, enhancing linearity and reducing distortion.
You build better amplifiers by staying engaged with online forums, reading expert books, and exploring trusted brands like Auway.
You learned advanced concepts in audio power amplifier design. Mastering amplifier classes, performance metrics, and practical design helps you build reliable systems. Key takeaways include gain, bandwidth, efficiency, noise figure, linearity, and impedance. To deepen your expertise, gather tools, prototype circuits, test audio output, transfer to PCB, and check functionality. Explore recommended books and Auway solutions. Keep learning and innovating to achieve clear sound and lasting performance.
You should focus on Total Harmonic Distortion (THD). Low THD ensures clear sound. Most professional amplifiers aim for THD below 0.1%. Always check this value when you compare models.
You need to match your application to the amplifier class.
Class A: Best for high-fidelity audio
Class D: Ideal for portable devices
Class AB: Good balance for home systems
Grounding prevents noise and hum. Star grounding works best for high-fidelity systems. You should avoid loops, which can cause interference. Proper grounding keeps your audio signal clean.
You can use an oscilloscope, Audio Precision SYS2722, or APx585 HDMI Analyzer. These tools measure distortion, frequency response, and noise. Reliable testing helps you improve your design.
Shielded cables and L-C filters block EMI.
Place power supplies away from sensitive circuits.
Test your amplifier in its final location to spot new sources of interference.
Feature | Benefit |
|---|---|
Thermal sensors | Prevent overheating |
Fuses | Stop surges |
Load detection | Avoid mismatches |
You should choose amplifiers with built-in protection for reliable operation.
You can use Class D or Class DG designs. These classes offer high efficiency and good sound. Proper filtering and layout help you maintain audio quality.
You should read books by Cordell and Self.
Join forums like Audio Science Review or DIY Audio.
Explore Auway’s website for technical support and product details.


