
Views: 0 Author: Site Editor Publish Time: 2026-11-15 Origin: Site


High-channel-count audio environments require massive power reserves. Whether designing Dolby Atmos home theaters or distributed commercial audio zones, you face intense power demands. Traditional linear amplifiers introduce prohibitive heat and weight penalties. They require excessive rack space and robust cooling infrastructure. Modern Class D units solve these spatial and thermal constraints effectively. However, integrating them requires careful power supply evaluation, accurate gain staging, and strict impedance matching. Ignoring these steps creates critical performance bottlenecks. This guide details how to architect, evaluate, and implement a stable multi-channel audio system using switching amplification. We cut through inflated power specifications to ensure reliable, high-fidelity deployment. You will learn actionable steps to maximize system headroom. You will also discover how to optimize layouts, interpret specifications accurately, and deploy professional-grade hardware for flawless acoustic performance.
Switching power amplifiers deliver over 85% energy efficiency, making them the only viable architecture for high-density multi-channel racks without dedicated HVAC cooling.
Total continuous power across *all* driven channels—not peak 1kHz marketing ratings—is the critical metric for evaluating a professional audio amplifier system.
Modular configurations (like using a dedicated four channel power amplifier for surrounds combined with separate high-power modules for LCRs) often yield better power supply headroom than single-chassis 11-channel receivers.
Successful implementation requires strict attention to EMI/RFI shielding, proper grounding schemes, and accurate gain staging to maximize the noise floor.
Heat dissipation remains the biggest enemy of electronics. Linear power supplies waste immense energy as heat. Switch Mode Power Supplies (SMPS) operate much differently. They convert AC to DC rapidly. This fast conversion reduces wasted thermal energy significantly. Packing 16 channels of Class AB amplification into a single rack risks instant thermal shutdown. A modern switching power amplifier converts over 85% of incoming electricity into usable audio power. It runs drastically cooler. You save money on dedicated HVAC cooling infrastructure. Your gear also lasts longer due to reduced thermal stress.
Amplifier Class | Average Efficiency | Heat Dissipation Factor | Rack Density Suitability |
|---|---|---|---|
Class A | 20% - 30% | Extremely High | Poor (Needs massive spacing) |
Class AB | 50% - 60% | Moderate to High | Moderate (Needs 2U-3U gaps) |
Class D (SMPS) | 85% - 95% | Very Low | Excellent (High density possible) |
Power density drives dynamic headroom. Modern SMPS designs react instantly to transient audio peaks. Heavy copper transformers are obsolete here. Audio engineers now use fast-switching MOSFETs instead. They supply instantaneous current exactly when the soundtrack demands it. Explosions in action movies require sudden energy bursts. Fast MOSFETs deliver this current without voltage sag. This design creates a tighter, more controlled bass response.
We must dispel the Class D fidelity myth immediately. Legacy audio purists often complain about high-frequency switching noise. Modern engineering has entirely eliminated this problem. Advanced post-filter feedback loops monitor the output signal constantly. They keep Total Harmonic Distortion plus Noise (THD+N) well below human hearing thresholds. Today, these modules match or exceed their linear counterparts in clarity. They deliver a completely flat frequency response across the audible spectrum. The audio remains transparent, precise, and entirely load-invariant.
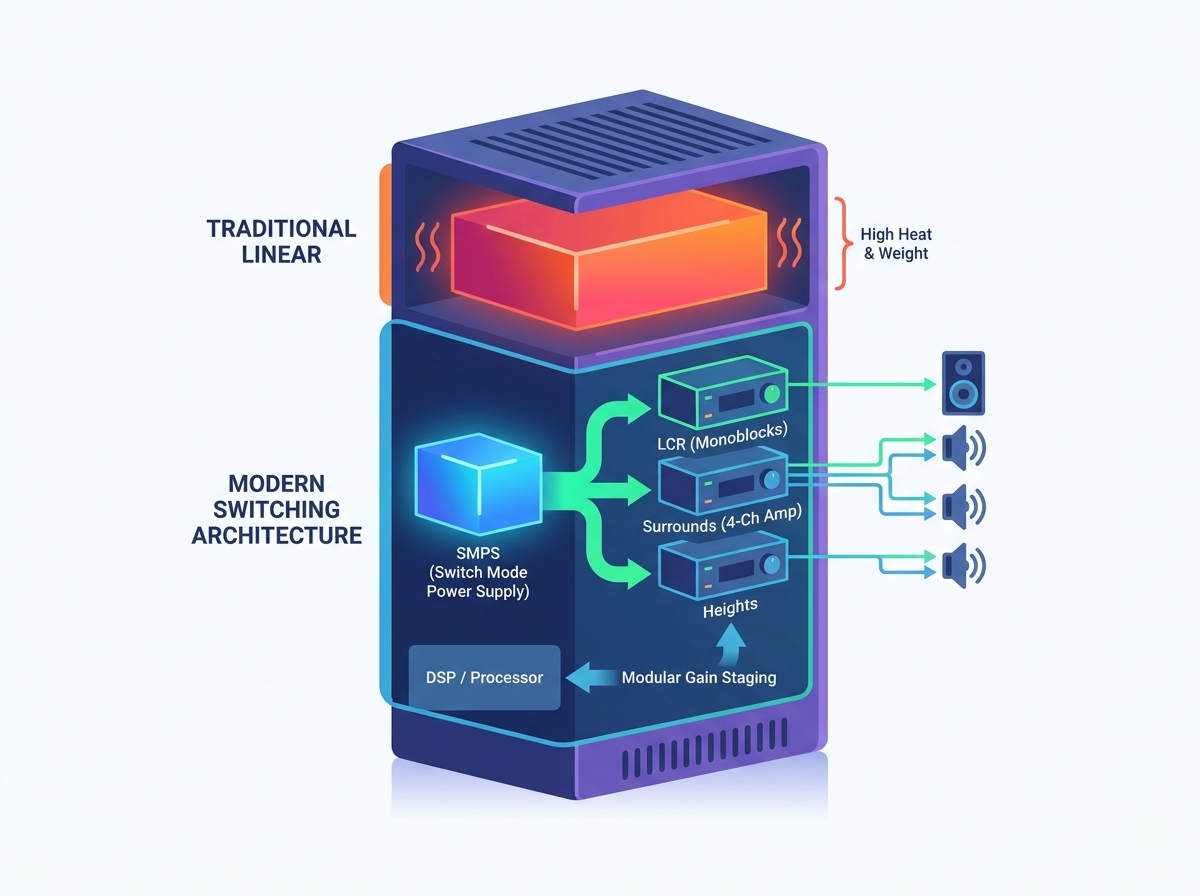
Building a robust rack requires specific architectural decisions. You must choose between a single chassis and modular frameworks. A single 16-channel distribution block certainly saves rack space. However, it strains one internal power supply heavily. Stacking multiple smaller units distributes the power load safely across different circuits. This prevents bottlenecks during loud, complex musical passages.
Splitting the audio load makes tremendous sense. You can dedicate a high-quality four channel power amplifier entirely to your height or surround speakers. You then pair this module alongside discrete high-current monoblocks for the front L-C-R array. This modular strategy prevents power supply sagging. When a demanding movie soundtrack hits, your main speakers get full current. Your surround speakers operate on an entirely independent power supply. Live performances stay dynamic, punchy, and incredibly immersive.
Consider Bridge-Tied Load (BTL) configurations carefully. Bridging channels inside a multi channel power amplifier effectively doubles the voltage output. Power-hungry passive subwoofers desperately need this extra voltage. Low-sensitivity tower speakers benefit greatly from BTL setups too. Be careful when bridging channels. Bridging an amplifier often halves its minimum impedance stability. If the unit handles 4 ohms normally, it might only handle 8 ohms bridged. Always check the manufacturer specifications before bridging any terminals.
Next, evaluate distributed versus localized placement strategies. You can place all gear in a central A/V server rack. This centralized approach looks clean. It centralizes your power management beautifully. However, it requires long speaker cables. Long cables introduce unwanted signal loss. They degrade damping factor. Alternatively, distribute the modules closer to the individual speaker zones. Localized placement reduces lossy cable runs significantly. It ensures maximum voltage transfer from the binding posts to the speaker voice coils.
Reading marketing spec sheets requires deep skepticism. You must specifically look for "all-channels-driven" power ratings. Many consumer brands advertise inflated 1-channel driven statistics. They usually measure these at 1kHz to show higher peak numbers. You should ignore these numbers completely. A true professional audio amplifier system provides FTC continuous ratings. This means it delivers the specified power from 20Hz to 20kHz while driving every single channel simultaneously. Real-world audio requires full-bandwidth performance.
Power supply overhead dictates the overall system capability. Your amplifier remains only as capable as its internal SMPS. Evaluate the Volt-Ampere (VA) rating carefully. Calculate the total wattage output of the power supply itself. A 7-channel amplifier claiming 200 watts per channel needs a massive power supply. If the internal SMPS only supplies 800 watts total, it will clip. Ensure it will not starve when multiple channels demand high current at once.
Impedance stability separates professional gear from consumer toys. Check the stability rating against extreme speaker load drops. Speaker impedance is not a static number. Some 8-ohm speakers drop down to 3 ohms during heavy mid-bass sequences. Ensure your unit will not enter emergency protection mode. It must handle demanding 4-ohm loads across multiple zones reliably.
Input sensitivity determines your DSP integration success. Evaluate the input voltage requirements before purchasing anything. You must match your pre-amplifier output voltage to the amplifier input sensitivity. Doing so prevents harsh clipping at the input stage. XLR balanced connections generally offer higher voltage output than RCA unbalanced connections.
Always demand 20Hz-20kHz THD ratings, never just 1kHz.
Check the idle power draw to calculate baseline rack temperatures.
Verify damping factor specifications for better woofer cone control.
Look for dedicated clipping indicators on the front panel.
Ensure the unit features heavy-duty binding posts, not cheap spring clips.
Implementing a flawless multi channel amplifier setup requires strict hazard mitigation. Switching power supplies operate at very high internal frequencies. They usually run between 100kHz and 1MHz. You must manage EMI/RFI interference strictly. Separate all low-voltage signal cables from the thick amplifier power cables. Do not run them parallel inside the same conduit. Crossing them at perfect right angles prevents magnetic cross-talk. It stops high-frequency noise injection effectively. Use heavily shielded interconnects for all analog audio paths.
Ground loop prevention requires careful, methodical planning. High-channel audio systems often suffer from nasty 60Hz hums. Establish a common-point grounding scheme for the entire rack. Plug all audio equipment into the same electrical sub-panel. Use balanced XLR connections everywhere possible. Balanced lines reject common-mode noise brilliantly inside the cable. They use precise phase cancellation to destroy induced noise. Utilize ground lift switches safely if a persistent hum still occurs. Never break the earth safety ground on a power cable.
Do not ignore thermal management inside your equipment rack. High electrical efficiency never equals zero heat generation. Stacking multiple switching modules generates localized hot spots. Leave at least 1U of empty space between heavy-duty modules. Install active cooling fans in enclosed server racks. Push cool air in from the bottom. Pull hot air out through the top. Proper airflow guarantees long-term reliability. It prevents premature capacitor degradation inside the SMPS circuitry.
Bundling power cables and speaker wires tightly together using zip ties.
Blocking the side ventilation holes of the amplifier chassis.
Plugging amplifiers into cheap, unconditioned power strips.
Ignoring the weight distribution inside the rack (place heavy units at the bottom).
Deploying your hardware requires a highly methodical approach. Do not rush the installation process. Follow these specific phases to guarantee flawless, safe operation from day one.
Phase 1: Pre-Wiring and Verification. Measure the nominal impedance of all speaker runs first. Use a reliable digital multimeter. Test the wires before connecting any hardware. This crucial step ensures no dead shorts exist hiding inside the walls. A dead short will trigger the amplifier protection circuit immediately. It might even damage the output stage. Label every wire clearly at both ends.
Phase 2: Power Sequencing. Implement remote 12V triggers. Sequence the power-on cycle carefully. Turning on multiple high-wattage SMPS units simultaneously causes massive inrush current. This sudden electrical draw will trip household circuit breakers instantly. Sequence them properly. Introduce a 2-second delay between each unit firing up. Smart power conditioners handle this sequencing automatically.
Phase 3: Gain Staging and Level Matching. Set the gain structure properly. Balance the DSP output against the hardware input. Keep amplifier gains optimized. Never turn amplifier attenuators to maximum blindly. Proper staging lowers the background hiss significantly. A sensitive multi-channel environment demands an absolute silent noise floor. Use an SPL meter to level-match all speakers precisely at the listening position.
Phase 4: Load Testing. Run pink noise through the entire room. Execute full frequency sweeps slowly. Verify all channels fire uniformly. Listen closely for strange rattling artifacts. Ensure you do not trip the thermal or over-current protection circuitry. Play a highly dynamic movie scene at reference volume. Monitor the amplifier faceplates for red clipping lights. If they flash, reduce your master processor volume.
Building a robust multi-channel array offers unmatched electrical efficiency. Switching modules deliver incredible power density safely. They save rack space and lower your cooling requirements dramatically. You just need adequate power supply overhead and strict cable management. Keep your grounding schemes clean. Evaluate specifications based on all-channels-driven continuous power. Avoid marketing hype surrounding peak wattage.
Here are your immediate next steps. First, audit your current speaker impedance loads accurately. Second, calculate the total necessary wattage needed for adequate dynamic headroom. Third, shortlist your modules based entirely on continuous RMS ratings. Finally, prioritize units featuring balanced XLR input options. Following these steps guarantees a powerful, noise-free audio deployment.
A: Modern switching amplifiers sound incredibly neutral. Early iterations suffered from high-frequency harshness. Today, advanced feedback loop designs create entirely load-invariant frequency responses. They deliver transparent audio. In double-blind tests, listeners cannot distinguish them from premium Class AB models. They simply provide tighter bass control due to high damping factors.
A: Yes, you can mix them safely. You must perform accurate gain matching during setup. Many integrators use Class AB units for sensitive tweeters or front LCR channels. They then deploy Class D modules to drive power-hungry subwoofers and surround arrays. Ensure your processor can level-match the different amplifier sensitivities.
A: Peak power reflects instantaneous capacitor reserves. The internal SMPS can deliver massive current bursts for fractions of a second. This handles dynamic movie transients perfectly. Continuous power testing uses sustained sine waves. Sine waves push the SMPS thermal limits harder than real music or movies ever will.
A: It depends entirely on the total output wattage. Because switching amplifiers hit 85% efficiency, they draw less wall current than linear amps. To calculate wall draw, divide total continuous audio wattage by 0.85, then divide by your wall voltage (120V). A 20-amp circuit provides roughly 2400 watts safely.


